Welcome to the latest installment of our AI programming series! In this post, we will show you How to create an awesome animation of the diffusion process using the Hugging Face diffusers library. If you’ve ever wanted to see the magic of AI-generated images unfold before your eyes, you’re in the right place. Let’s get started!
Introduction to Diffusion Models
Diffusion models are a class of generative models that iteratively refine random noise into coherent images. These models have gained significant attention for their ability to produce high-quality, photorealistic images. Hugging Face’s diffusers library provides an easy-to-use interface to experiment with these models.
Purely speaking, what we will be animating is the reverse diffusion process, the part of the diffusion process that transforms noise into an image.
For a very simple first example of using the diffuser library in Colab, check my previous post about How to generate awesome AI images in 10 lines of Python
Prerequisites
Before we dive into the code, make sure you have the following prerequisites:
- A Google Colab account (for running the code online)
- Basic understanding of Python programming
- Familiarity with machine learning concepts
Step 1: Setting Up the Environment
First, we need to install the required libraries. Open a new Colab notebook and run the following code to install the diffusers and accelerate libraries:
!pip install diffusers accelerateStep 2: Creating a Stable Diffusion Pipeline
Next, we’ll create a stable diffusion pipeline using a pre-trained model from the Hugging Face library. In this example, we’ll use the Dark-Sushi-2.5D model.
from diffusers import DiffusionPipeline, EulerAncestralDiscreteScheduler
import torch

pipe = DiffusionPipeline.from_pretrained('tensor-diffusion/Dark-Sushi-2.5D', torch_dtype=torch.float16)
pipe.scheduler = EulerAncestralDiscreteScheduler.from_config(pipe.scheduler.config)
pipe.to("cuda")
Step 3: Setting Up a Callback Function
To capture intermediate images at each step of the diffusion process, we need to define a callback function. This function will be called at each step, allowing us to save the generated images and visualize the progression from noise to a coherent image.
Detailed Explanation of the Callback Function
The callback function latents_callback performs the following steps:
vae = pipe.vae
images = []

def latents_callback(pipe, step_index, timestep, callback_kwargs):
    latents = callback_kwargs["latents"]
    latents = 1 / vae.config.scaling_factor * latents
    image = vae.decode(latents).sample[0]
    image = (image / 2 + 0.5).clamp(0, 1)
    image = image.cpu().permute(1, 2, 0).numpy()
    images.extend(pipe.numpy_to_pil(image))
    return callback_kwargs
Breakdown of the Callback Function
- Access the Latents: The function retrieves the current state of the latent variables from the
callback_kwargsdictionary usinglatents = callback_kwargs["latents"]. Latents are the internal representations of the image at the current step. - Scaling the Latents: The latents are scaled using
latents = 1 / vae.config.scaling_factor * latents. This scaling is necessary to bring the latents to the appropriate range before decoding. - Decoding the Latents: The function decodes the latents into an image using the VAE (Variational Autoencoder) decoder:
image = vae.decode(latents).sample[0]. Thesample[0]part extracts the decoded image tensor. - Post-Processing the Image: The decoded image is normalized to the range [0, 1] using
image = (image / 2 + 0.5).clamp(0, 1). This step ensures that the pixel values are suitable for display. - Reformatting for Display: The image tensor is moved to the CPU and its dimensions are permuted to match the expected format for visualization:
image = image.cpu().permute(1, 2, 0).numpy(). The result is a NumPy array with shape (height, width, channels). - Saving the Image: The image is converted from a NumPy array to a PIL (Python Imaging Library) image and added to the
imageslist usingimages.extend(pipe.numpy_to_pil(image)). This allows us to keep track of all intermediate images generated during the diffusion process. - Return Callback Kwargs: Finally, the function returns the
callback_kwargsdictionary to ensure the diffusion process continues smoothly.
Purpose of the Callback Function
The primary purpose of this callback function is to capture and save the intermediate states of the image as it evolves through each diffusion step. Doing so allows us to create an animation that visualizes the entire process, from initial noise to the final generated image. This helps us understand and appreciate how the diffusion model progressively refines the image.
Step 4: Generating Images
With our pipeline and callback function ready, let’s generate images step-by-step using a prompt and a negative prompt to refine the image quality. We will call our latents_callback function at each step of the diffusion process to capture intermediate images.
Understanding the Parameters
When generating images, we use two important parameters:
callback_on_step_end: This parameter allows us to specify the callback function (latents_callback) that will be called at the end of each diffusion step.callback_on_step_end_tensor_inputs: This parameter defines the inputs that the callback function will receive. In this case, we pass["latents"]to provide the current state of the latent variables.
Here’s the code to generate images:
prompt = "masterpiece, best quality, (1girl), woman, slim body, full body, purple hair, double bun, long hair, light purple eyes, white plain t-shirt, short blue jeans"
negative_prompt = "nude, bad anatomy, blurry, fuzzy, extra legs, extra arms, extra fingers, badly drawn hands, poorly drawn feet, disfigured, out of frame, tiling, terrible art, deformed, mutated, cgi, octane, render, 3d, doll"

final_image = pipe(prompt=prompt,
                   negative_prompt=negative_prompt,
                   height=512,
                   width=288,
                   guidance_scale=7,
                   num_inference_steps=30,
                   callback_on_step_end=latents_callback,
                   callback_on_step_end_tensor_inputs=["latents"]).images[0]

images.append(final_image)
Step 5: Displaying the Images
We can now visualize the images generated at each step. Here’s a utility function to display them in a grid.
from matplotlib import pyplot as plt

def showImages(Images, rows, cols):
    px = 1/plt.rcParams['figure.dpi']  # pixel in inches
    fig = plt.figure(figsize=(cols*Images[0].width*px, rows*Images[0].height*px))

    numCells = cols*rows
    numImgs = len(Images)
    loopEnd = min(numCells, numImgs)

    for i in range(1, loopEnd + 1):
        ax = fig.add_subplot(rows, cols, i)
        plt.axis(False)
        plt.imshow(Images[i-1])

    fig.tight_layout()
    fig.subplots_adjust(left=0.15, top=0.95)
    plt.show()

# Show the images
showImages(images, rows=1, cols=len(images))
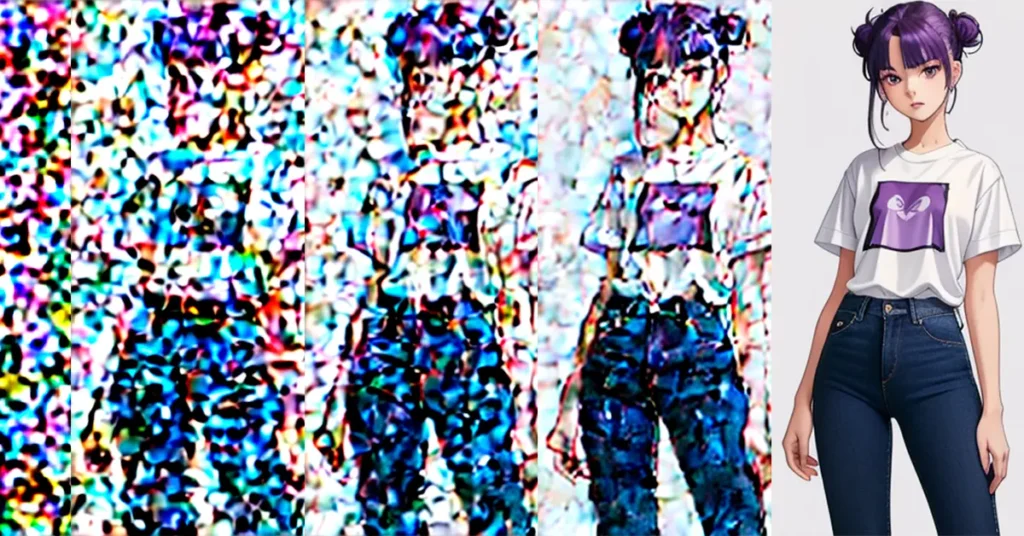
The call to the showImages function returns the following grid of images:

Step 6: Create an animation of the diffusion process
Creating an Animated GIF
To better visualize the diffusion process, we can create an animated GIF from the images. We can use the imageio library
# Install library to generate animated gifs
!pip install imageio

# Generate an animated gif from an array of images
import imageio
imageio.mimsave('DiffusionSteps.gif', images, duration=0.5)
This code will create the following animated gif file (DiffusionSteps.gif) in the content folder:
Exporting as a Video File
Another way to create an animation of the diffusion process is to export the animation as a video file using the moviepy library.
The moviepy library is a Python library for video editing, creation, and manipulation. It allows you to edit and compose videos programmatically, including cutting, concatenating, adding effects, and exporting in various formats. It is widely used for creating video clips, GIFs, and complex video projects directly within Python.
# Install library to generate video files
!pip install moviepy

# Generate a video file from an array of images
from moviepy.editor import ImageSequenceClip
import numpy as np

# Convert PIL images to NumPy arrays
image_array_np = [np.array(img) for img in images]
# Create a clip from the image sequence
clip = ImageSequenceClip(image_array_np, fps=15)

# Write the video file
clip.write_videofile("DiffusionSteps.mp4", codec="libx264")
Click here to view a full size video of the process
Conclusion
You’ve successfully created an animation visualizing the diffusion process using Hugging Face diffusers! This visualization provides a step-by-step look into how diffusion models transform noise into detailed images. Experiment with different prompts and settings to create your unique animations. Stay tuned for more exciting tutorials in our AI programming series!
Feel free to share your animations or ask questions in the comments below.
Happy coding!